Author: khaxan

Disable Flash in Microsoft Edge (Windows 10)

How to disable Flash in Microsoft Edge (Windows 10)

In Windows 10 you don’t need to install separately flash player like you used in previous Windows versions or browsers like IE/Chrome/Firefox. Now flash player is integrated with Microsoft Edge, the replacement of Internet Explorer.

Recently a new (yes, yet another one) vulnerability has been discovered for Adobe Flash Player. In order to update it you can’t go directly to Adobe website but rather it will updated with Windows Update.

In order to allow or block Flash on Edge you should follow the following steps:

  • Click the button “…” on the upper right corner of Microsoft Edge

  •   Click on View Advanced Settings
  • Look for “Use Adobe Player” and click on it to change from On to Off

Remember: Flash is a buggy software. Update it but try to keep it disabled unless you really need it (most cases you won’t!).

To disable Flash Player in Chrome or Firefox see: Disable Flash on Chrome and Firefox

I hope this information is useful. Buy me a coffee?

Buy Me a Coffee at ko-fi.com

Disabling Autofill and Saved Passwords in Firefox and Chrome

Let’s face it, we hate to type unnecessary stuff, so if our browser can fill out information for us we’re on board!

Autofill is the feature that automatically completes form data with information you have previously entered.

autofillex

However handy this might seem, it presents a huge privacy and security risk. The information that is saved in your browser – names, addresses, passwords… even credit card numbers – can be stolen through shady scammers websites and in other ways. You can read more about it here: Autofill flaw lets scammers steal credit card information

The safest option is always type the information. If you use a password manager like LastPass or KeePass copy and paste the information instead of using an autofill feature or plugin.

Disabling Autofill and Saving Passwords features in Chrome

Go to the Settings Menu Option

  • Click on the 3 dots button to view the menu
  • Click on Settings

settings

Go to the bottom of the Settings page and click on Shows advanced settings…

advanced

Go to the section Passwords and forms and remove the checkmark on the following options. This will disable both the autofill option and the save passwords option.

autofill

You’re all set!

Disabling Autofill and Saving Passwords features in Firefox

  • Click on the “Open” button (3 lines button)
  • Click on Options


options

  • On the left menu click on Privacy
  • On the History section change to “Use Custom settings for history”
  • Remove the checkmark on “Remember search and form history”

privacy

To also disable websites login information (user/password combinations):

  • On the left menu click on Security
  • On the Logins section remove the checkmark “Remember login for sites”

security

Done!

How to tell Thunderbird to Request Confirmation Before Deleting an Email or Empty the Trash

How to re enable confirmation warnings before deleting an email or Emptying the Trash Folder on Mozilla Thunderbird

I tend to delete emails from Thunderbird using SHIFT+DEL out of habit when I’m sure I don’t want that message any more, but recently I accidentally ticked the check-box that tells Thunderbird not to ask me if I’m sure I want to delete such message(s).

deletemail4

Although safer, I didn’t want to delete messages then empty the trash. For whatever reason I wanted to return to the past behavior. In case this has happened to you, here are the steps to get the warning back:

  • Go to the Tools Menu
  • Click on Options
  • Click on Advanced

The picture below shows the Options-Advanced Window. In the lower right you’ll see the “Config Editor” button. Click on It.

deletemail2

You will receive a fair warning as this. Click on I’ll be careful, I promise!

deletemail3

Now you’re on the configuration section. The value I want to change here is:

mail.warn_on_shift_delete   from false to true. To change the value, just double click on the line.

deletemail

If you want to re-enable the confirmation for emptying the Trash folder, the value you should modify is:

mailnews.emptyTrash.dontAskAgain    from true to false.

* Mozilla Thunderbird Version 38 used.


I hope this information is useful. Buy me a coffee?
Buy Me a Coffee at ko-fi.com

Enabling SSH on Cisco Catalyst Switches

Enabling SSH on Cisco Catalyst Switches

There are several ways to configure or monitoring a Cisco Device: console line (which requires a local cable, hence physical address), vty lines (via telnet or ssh), SNMP, and http/https access.

Since traffic through Telnet protocol travels in clear (non-encrypted) text, it’s best to configure remote access through a secure (encrypted) channel.

Before you proceed, verify your Cisco Device supports encryption. To check whether your device allows encryption issue the following command:

show version

Look for the line System image file and verify whether your IOS version have a “k9” substring in the file name. This indicates the version supports encryption.

Configuration Steps

  • Set a hostname and a domain name
  • Enable password encryption and create required usernames and passwords
  • Generate an encryption key
  • Restrict vty lines to use ssh
  • Restrict vty lines to allow incoming ssh traffic only from certain IP addresses (optional)
  • Block IP addresses after a certain number of failed attempts (optional)
Set a hostname and a domain name

A hostname is already set but you should change it to something more descriptive for your environment. A domain is not set by default and you must set this value to match your business infrastructure.

Change to enable mode, if you’re not already on it.

switch>enable
Password: < type your password >

Set your hostname and domain-name according to your own network.

switch#configure terminal
switch(config)#
switch(config)# hostname myswitch01
switch(config)# ip domain-name mydomain.com
switch(config)#exit
Enable password encryption and create usernames and passwords

The service password-encryption allows for ahem.. the encryption of every password (enable, username passwords) on the device. Issue it if you haven’t before (you probably have, though). Also create the users who can access your device and with which privileges. In this example the user database is local.

switch(config)#service password-encryption
switch(config)# username name privilege privilege# secret passwordtype# password  
switch(config)#exit

where
name: the user name
privilege#: 15 for enable permissions; 1 for normal user permissions
passwordtype#:

  • 0 if you’re going to type an unencrypted password;
  • 5 if you’re going to type an already encrypted password.

password: the actual password

The following example creates the user khaxan with enable permissions

switch(config)# username khaxan privilege 15 secret 0 G3tDHck0uT0H$re
Generating a crypto key

The Cisco device must create an encryption key before ssh could be enabled.

switch(config)# crypto key generate rsa general-keys modulus modulus_size

You can choose a modulus size up to 2048. The longer the better so:

switch(config)# crypto key generate rsa general-keys modulus 2048

Wait a bit while the system creates the key.

Restricting vty lines to use only ssh (don’t allow telnet)

In configuration mode allow only incoming ssh connections with the command transport input ssh (by default lines don’t allow any connections), and indicate the authentication is taking place against the local database (the users you created before).

switch(config)# line vty 0 4
switch(config-line)# transport input ssh
switch(config-line)# login local
Restricting vty lines to only allow ssh from certain subnets (Optional)

If you want to add a bit of extra security, you can create a list of IP addresses which are allowed to connect via ssh to the Cisco device.

The following example creates the standard access list 1 to permit traffic from the subnet 10.10.10.0 with logging enabled.  A deny statement is implicit in the ACL so technically the second access-list line is not needed unless you want to log unauthorized connection attempts (Always check who’s trying to connect to your server!).

Apply that ACL to the vty lines accepting SSH.

switch(config)# access-list 1 permit 10.10.10.0 0.0.0.255 log
switch(config)# access-list 1 deny any log
switch(config-line)# line vty 0 4
switch(config-line)# access-class 1 in
Block IP addresses after a certain number of failed attempts (optional)

Also, if you want to prevent the casual attacker you can block their IP addresses for a period of time use the command login block-for; this will prevent brute force attacks to the device.

The example below blocks for 1 hour (3600 seconds) an IP address with 5 failed login attempts within 50 seconds.  Important: Choose carefully the proper times for your environment. If you select a very low fail-attempt-threshold like 2 failed login attempts within 60 seconds then you might be blocking yourself if you accidentally type a wrong password 2 times in 1 minute.

switch(config)# login block-for 3600 attempts 5 within 50

That’s it. You should be able to connect to your device via your favorite SSH client.

Disable Flash in Internet Explorer (Latest Version)

How to disable Flash in Internet Explorer (10/11)

In IE 10/11, go to the upper right corner and click on the Tools Menu (cogwheel icon). Click on Manage add-ons.

ie1

In the bottom left change the “Show” options to “All add-ons” and look for Shockwave Flash.

ie2

Right click on the “Shockwave Flash Object” and click on Disable.

ie3

Remember: Flash is a buggy add-on. Update it but try to keep it disabled unless you really need it (most cases you won’t).

To disable Flash Player in Chrome or Firefox see: Disable Flash on Chrome and Firefox

Disabling Flash on Chrome and Firefox (Latest versions) updated Oct-2017

POST UPDATED: OCTOBER 16, 2017

noflash
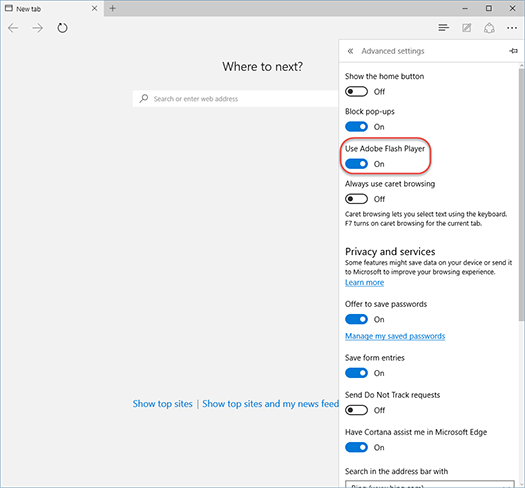
Flash is phasing out. Every day fewer websites run with Flash since they have replaced it with HTML5 and other formats. Why? Among other things Flash is VERY insecure. For example, there are a lot of flash ads that right now are being injected with malicious code in order to infect everybody visiting certain sites with those ads. You don’t have to click on anything, you don’t have to download a file, you’ll be infected just by getting there.

Today as basically any other day new Flash vulnerabilities came to light; you can see the full list  https://www.cvedetails.com/vulnerability-list/vendor_id-53/product_id-6761/Adobe-Flash-Player.html. Vulnerabilities still unpatched (0day) could potentially allow remote access to your computer and data.

If you don’t use flash it’s best to disable it, but if you need it from time to time (certain websites and devices still only use Flash), set your browser to “Ask First” and update to the latest Adobe Flash Player Version https://get.adobe.com/es/flashplayer/.

Disabling Flash in Chrome

The easiest and fastest way to do it is typing on the location bar:

chrome://settings/content

settingscontent
Figure 1.  Content Settings

Or if you want the long and click-y version, click on the upper right menu and click on Settings.  settings

On the window that will appear go to the bottom and click on Advanced. More options will appear including “Content Settings

contentsett

Click on that option, it will show the same information that on Figure 1 above.

You’ll see an option for Flash, click on it.

If you want Chrome to ask before running Flash make sure your setup looks like the picture below. This picture shows that Chrome is allowing sites to run Flash but also to ask before running it on a website.

before

The next time a website is trying to use flash a dialog similar to this will appear:

askfirst2

If you want to completely disable Flash, disable Allow sites to run flash clicking on the blue button, the text now will change to Block sites from running Flash

block

This window also has the option to block and allow flash per website, either manually or if you selected “Ask First” it will remember your choice of Allow/Block for individual sites.

That’s it!

Disabling Flash in Firefox

Click on the menu symbol 2014-01-10-13-08-08-f52b8con the upper right corner and click on add-ons or on the location bar type about:addonsaddonfirefox

On the left side menu, click on Plugins  Search for Shockwave Flash or Shockwave for Director (Annoyingly this was the previous name for the Flash plugin).

ff2 
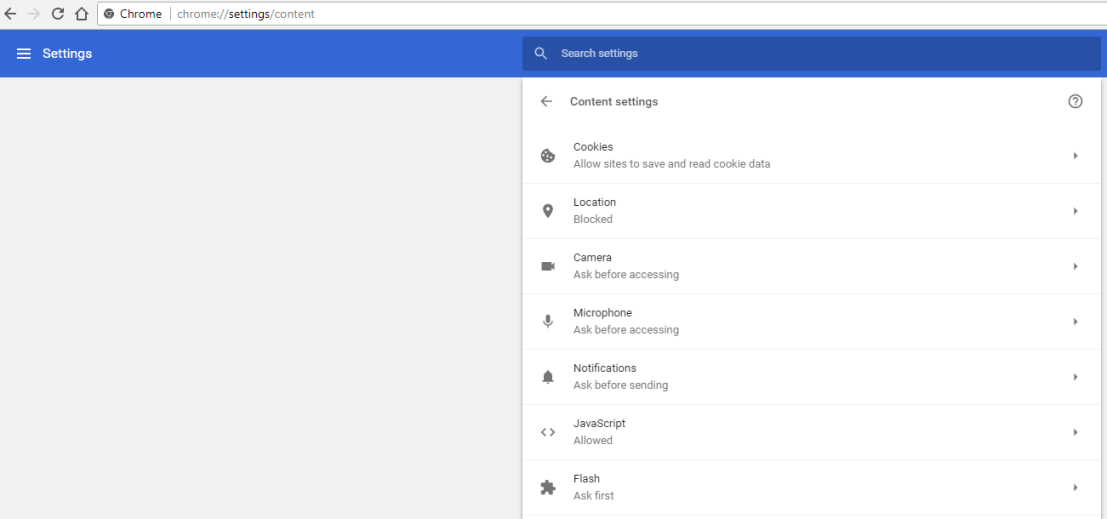
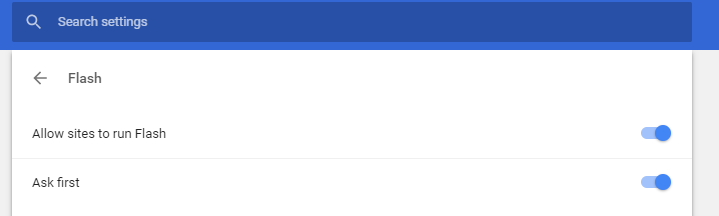
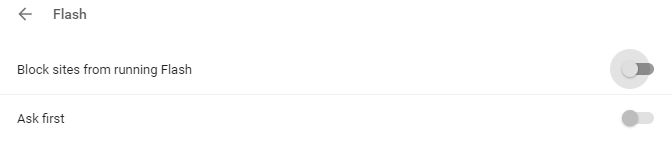
Here you can choose  “Ask to Activate“, which in essence would make Firefox to ask to activate Flash in case a site needs it. (See Figure below). activateflash Nowadays, this would be rare, since most Flash on the Internet is in ads, not actual content, and even sites who use Flash have an alternate version without it. So you can disable Flash for good, selecting Never Activate. You will see something like this in a web page which only uses Flash. flashdisable

Final Notes

My personal recommendation is to disable Flash since these vulnerabilities are recurrent.

If you want to know how to disable Flash on Internet Explorer:

https://360techstuff.com/disable-flash-in-internet-explorer-latest-version/

If you want to know how to disable Flash on Microsoft Edge:

https://360techstuff.com/disable-flash-in-microsoft-edge-windows-10/

To improve your security:

  • Keep your Operating System, Browsers and Plugins/Add-Ons updated
  • Stay away of suspicious websites
  • Use an ad blocker like Ublock Origin or Adblock Plus
  • Install protection software like Malwarebytes anti Malware and Anti-Exploit


I hope this information is useful. Buy me a coffee?

Buy Me a Coffee at ko-fi.com

Managing The Exim Queue (For SysAdmins) – Removing Unwanted Messages From the Exim Queue

Have you ever had a rogue user trying to spam the world -on purpose or just because he catched a bad bug? -, a temporary problem with your Carrier, users who endlessly type hotmal, gmal, hotmial, instead of… you got the idea!  Then you’ve probably experienced having an email queue so long you can’t see the end of it and it would take hours to process.

You can see how many messages are in the queue issuing exim -bpc and see the queue with exim -bpu

In order to accelerate the queue delivery, we can give it Exim a hand.

Deleting all Frozen messagesice-34075_640

Frozen messages are just bounce messages, that is, notifications that a certain message delivery failed.

Those messages are stuck and going nowhere (**) so let’s just delete them.

You have two options:

exim -bpr | grep frozen | awk ‘{print $3}’ | xargs exim -Mrm

Basically we just examined the queue, look for the word frozen, got the message ID and pass that id to exim to delete it. Or even better run this to get the same result without affecting emails including the word frozen in some part of the email.

exiqgrep -z -i | xargs exim -Mrm

Now, If you don’t want to type that much just create a script to do that. For example:

#!/bin/bash
exiqgrep -z -i | xargs exim -Mrm

Call it removefrozen.sh or whatever you want; place it in an appropriate path and just call the script everytime you need it without the hassle.

Additionally, you might want to modify this lines in the exim configuration file:

ignore_bounce_errors_after = 2d      -> unfreezes a bounce and exim will try to deliver again
timeout_frozen_after = 7d                 -> deletes frozen messages after 7 days

to

ignore_bounce_errors_after = 12h         
timeout_frozen_after = 1d                    

To expedite the process of elimination of such bounces. Now let’s get rid of other messages.

(**) Frozen messages should be investigated to prevent them.

Deleting old messagesclock-147257_640

Messages that have been in the queue for a while, let’s say 1 day or 2 days are unlikely to be delivered. (*) Sometimes the remote mailbox is full, or the domain is non-existent and the message would be attempted to be delivered for as long as it is configured in the exim “configure” file; usually 4 days.

You can lower that value directly in the configuration file, but if you want to keep the default values and just delete old messages at your command you can run exiqgrep and delete messages based on certain time.

Now, this is something I don’t recommend doing, because you can prevent legitimate mail from being delivered, but if you have no option, the following example command deletes all messages which have been in the queue for more than 1 day (in seconds).

exiqgrep -o 86400 -i | xargs exim -Mrm

Again, you can add the command to a simple script for easier access.

Deleting messages to non-existent domains question-mark-160071_640

Now, there’s no way for exim to know if a domain is valid or not. It only knows if the DNS lookup has failed. (*) That’s why this is a tricky one. However, typos are obvious some times, and if you can identify them you can delete a good amount of emails. Now remember, you should give exim some time to attempt to deliver the message so the sender is notified of the failed delivery. Otherwise, the sender would never know he tried to send a message to a wrong recipient.

Some of the super typos I’ve seen are hotmal.com, hotmial.com, homail.com, yahooo.com, etc. A few of these domains exist but they’re not the ones the sender intended. Other cases would be very particular to your users so you might be able to identify those.

So, let’s delete messages to wrong domains with a script.

#!/bin/bash
exiqgrep -r $@ -i | xargs exim -Mrm

Call it, removerecipient.sh, i.e., and call the script with the domain or full email of the recipient you want to delete as a parameter.  Example: sh removerecipient.sh @hotmal.com

Or if you prefer typing the whole command: exiqgrep -r @hotmal.com -i | xargs exim -Mrm

IMPORTANT: The script above is just a basic example, it’s NOT sanitized and it will match partial coincidences. That is, if you intend to delete messages sent to gmal.com and you just execute removerecipient.sh gmal.com you’ll end up removing messages sent to gmal.com, agmal,com, logmal.com, etc., which may be potentially good domains.

The basic script is useful though if you want to delete thousands emails to russian, korean, etc. accounts and you have no business with them whatsoever, aka malware/SPAM.

Therefore, use with caution, use the whole email address (not just the domain) and verify the option passed as parameter inside the script. Also, ensure proper permissions are in place.

Deleting messages from non-existent senders  question-mark-160071_640

Use with the same precautions as the previous option. In this case, you delete messages from a certain sender, instead of a recipient.

#!/bin/bash
exiqgrep -f $@ -i | xargs exim -Mrm

Which it’s equivalent to exiqgrep -f fake@fakedomain.com -i | xargs exim -Mrm

Call it, removesender.sh, i.e., and call the script with the domain or full email of the recipient you want to delete as a parameter.  Example: sh removesender.sh @hotmal.com

Identifying the culprit of a spam attack magnifying-glass-29398_640

Now, all the delete commands stated above won’t stop a spam attack, they will only help in cleaning the email queue. You should identify the sender of the spam and block him. How?

First, you have to identify one of the spam messages and grabs its ID.

See the queue: exim -bpu

Identify a suspicious email, let’s say with ID 1ZCB3s-0007lp-N6 and check its body and its headers.

Checking the body (to verify your suspicion is correct)

exim -Mvb <message-id>
Example: exim -Mvb 1ZCB3s-0007lp-N6

If you see something like viagra promotions, malicious links, etc., you have a winner. Now, let’s check the headers:

exim -Mvh <message-id>
Example: exim -Mvh 1ZCB3s-0007lp-N6

I recommend using less afterwards to see the very first lines:

exim -Mvh 1ZCB3s-0007lp-N6 | less

Now look for the line starting with -auth_id. There you should see the username used to authenticate that email as valid to your email server. Don´t trust the sender you see in the queue because that’s just the envelope. For example you can see in the queue an email from remote@invalid.com with auth_id local@valid.com.

Once you have the address used to auth the spam, block it from your email server (suspend the account and/or change the password), warn the legitimate user, and adjust your spam filters accordingly. Also, you can block in your firewall the sender origin IP indicated in the line starting with -host_address, i.e. the spammer ip address.

Deleting ALL messages in the queue

If for some very special reason you want to delete ALL the email queue, then just issue:

 exiqgrep -i  |  xargs exim -Mrm

——-

In next posts, more queue management options coming.

(*) Always check if you don’t have a problem with DNS resolution.

Cookies – What they are, why they matter and how to get rid of the nasty ones.

Cookies  cookies

At this point, most people at least have heard about cookies in a non-dessert but websites sense. But what they really are and how they work remain obscure for some. So, let’s try to break it down a little.

What is a cookie?

A cookie is a data message that is stored in your Web Browser (i.e., in a file in your computer) when you visit certain websites.

cookie

Basically, you access the site and you receive the cookie that the website sent you. After that, every time you access that website, your web browser (Chrome, Firefox…), sends the cookie back to the website that created in the first place, and which it’s the only one allowed to read and modify the cookie contents.

Why do websites use cookies?

cookie2

Basically, to remember you and your previous activity on the site.

Look at it this way, let’s say your name is Sam and you’re a regular in a coffee shop where you’re always served by John and you always order black coffee. Chances are the next time you go there, John greets you with a “Hi Sam, nice to have you back here, do you want the usual? Maybe you’re interested in this muffin who’s a match made in heaven for your black coffee.” Does it sound familiar?

Well, websites try to do the same thing, just in the virtual world.  Cookies allow the website to greet you, the remember what products you were browsing last time you visited the site, products in a shopping cart or wish list, what your languages preferences are, and a lot of other stuff, for as long as the cookie stays in your computer.

Also, cookies are a mechanism to let the website know if you’re already logged in the site, so it doesn’t bug you asking for your password again and again (e.g. in a paid news site). These cookies are known as authentication cookies.

Can a cookie have a virus?

Not really. A cookie file is just a text file, it’s not code, so the cookie cannot perform any action by itself. Hence, a cookie is neither a virus or malware and they can’t install those in your computer either. However, cookies can be used to help malicious behavior by third-parties as it is explained below.

Can a cookie represent a threat?

They might, but not by themselves. The cookie is just a small text file which in the wrong hands may represent a privacy threat if a 3rd party has access to unauthorized information.

An attacker can use a bug/attack in your web browser to read cookies and gather information about you, your shopping patterns, the websites you access, and even the passwords you use to access those sites.The attacker can even use your cookies to impersonate yourself into a website.

ProTip: Never save a password in your browser, seriously.

Cookies can also be used to identify a computer infected with a certain malware, so this computer can be compromised or used later to participate in an attack to some other target. Again, the computer had to be infected in some other way (not by the cookie).

The privacy concern

There’s a particular type of cookie which arises controversy: The tracking cookie.

Remember your old normal cookie who only sends information to a website when you visit it? Well, now imagine you left the website with a spy at your back.

A tracking cookie will report to a website of your activities online, even if those activities had nothing to do with the website that gave you the cookie. This cookie will tell on you (like an annoying brother), what you’ve been doing, which sites have you been visiting, etc. Your information, along with the information of many others (in the thousands or even millions) will be analyzed and used – sometimes even sold- mainly for marketing purposes; personalizing the ads you see in a webpage, for example.

Facebook uses tracking cookies, in case you were wondering.

Although this is not harmful to you or your computer, you might not want to share your information with everybody. Most legitimate sites will let you opt-out being tracked and most popular web browsers have an option to send websites a “Do not track” request. However, this does not work at 100%, because some sites simply ignore your “do-not-track-me” request.

In conclusion, cookies are useful and harmless in the good hands, but in the wrong hands they could turn their back on you.

Minimizing Risks

If order to minimize the risks cookies might represent you SHOULD always have an antivirus or malware scanner up to date and regularly analyze your computer. A malware scanner should be able to detect if a cookie has information of a malicious site. I recommend MalwareBytes.

Also, you can delete the cookies from your web browser manually or configure the browser to delete cookies every time you close the web browser.

Keep in mind that if you delete the cookies, you’ll lose some of the cool personalized stuff some websites are able to show you thanks to them. So, there’s an alternate way: The EFF Privacy Badger. The EFF Privacy badger is a web browser extension (Chrome and Firefox) able to recognize which type of cookies (and spy ads) are in a website.

When you visit a site, this extension will allow the good cookies and block the bad ones (trackers and/or related to potential harmful sites). The picture below shows a visit to CNN where the Privacy Badger blocked a tracker (in red).

badger

Thanks for reading!

Configuring a NTP server in different Linux distributions

To configure a Linux computer as a basic NTP server, we need to go through the following steps:

Installing the NTP package

For CentOs, RedHat and Fedora distributions
yum install ntp

For Ubuntu and Debian distributions
apt-get install ntp
or
sudo apt-get install ntp

Configuring the NTP service

With your favorite text editor open the file /etc/ntp.conf to perform the following:

Specifying OUR external server for time synchronization

Our Time source (or sources) are specified in the lines starting with server. These are the servers to which our local server synchronizes. Here is an example:

server 0.centos.pool.ntp.org iburst
server 1.centos.pool.ntp.org iburst
server 2.centos.pool.ntp.org iburst
server 3.centos.pool.ntp.org iburst

Default server addresses vary according to the Linux distribution. You can use the default ones or specify the NTP server of your preference.  It is recommended to use the servers for your country or region specified in pool.ntp.org Server link: http://support.ntp.org/bin/view/Servers/NTPPoolServers.

It is recommended than more than one ntp server is present for redundancy in case one of the servers fail.

You might have noticed the word iburst in every line. The iburst option reduces the time in the initial synchronization and it is the default option.

The specified servers are used in a round-robin fashion. If you wish you to use one server above others, add the options prefer at the end of the server line like this:

server 0.centos.pool.ntp.org prefer

Allow clients restricted time synchronization with our time server

If  you want to allow any client to synchronize to your NTP server just add the line

restrict default kod nomodify notrap nopeer noquery

  • default: every client
  • kod: if access is denied, send a “kiss of death” packet. It’s used to prevent abuse of the server. See more here.
  • nomodify: client can not modify the server
  • notrap: prevents ntpdc control message protocol traps
  • nopeer: deny packets trying to establish a peer association
  • noquery: clients can not query status information from our server (like our Operating System or NTP server version); however, they can still get time sync from our NTP server. If you want to block time synchronization you should add the option noserve.

Allow localhost IP to perform any function in the NTP server

The localhost ip 127.0.0.1 is often used for administrative functions; hence, to bypass the “default” restrict policy, add:

restrict 127.0.0.1
restrict ::1

The above lines give the localhost IP address unrestricted access to the NTP server operations.

Specifying the Location of the Drift File

The driftfile keeps track of clock deviations.

driftfile /var/lib/ntp/ntp.drift

That’s pretty much it for a basic configuration, but let’s just add some extra features for security. (This post doesn’t cover advanced security options like authentication).

Allow only specific clients to synchronize with our NTP server

If you added the noserve option in the restrict default line you might want to add specif hosts or networks which will be allowed to synchronize with your server. They usually are hosts or networks in your LAN, or otherwise known devices. For example:

If you want to allow the network 10.10.10.0/24 to query your NTP server add the following line:

restrict 10.10.10.0 mask 255.255.255.0 nomodify notrap nopeer 

If you want to allow the specific host 10.10.10.2 to query your NTP server add the following line:

restrict 10.10.10.2 nomodify notrap nopeer                -> mask 255.255.255.255 is assumed

That network and that host would be able to query your server for time sync and get status information from your server.

Using Local Clock as Backup

In case your server loses access to the Internet, it’s a good idea to failover to the server internal clock.

server 127.127.1.0                                   -> NTP server’s own pseudo address
fudge 127.127.1.0 stratum 12

Use stratum 10 to 15 so it’s never used unless no external server is reachable.

Configuring Logging Parameters

Specify a file path for the logs, although no mandatory it is very useful for debugging:

logfile /var/log/ntp.log


A complete basic /etc/ntp.conf should look like this (As you can imagine the -6 lines, are intended for IPv6 protocol) :


server 127.127.1.0                                  
fudge 127.127.1.0 stratum 12               

server 0.pool.ntp.org iburst
server 1.pool.ntp.org iburst
server 2.pool.ntp.org iburst
server 3.pool.ntp.org iburst

restrict default kod nomodify notrap nopeer noquery
restrict -6 default kod nomodify notrap nopeer noquery

restrict 127.0.0.1
restrict -6 ::1

driftfile /var/lib/ntp/ntp.drift
logfile /var/log/ntp.log


Starting the NTP Service

For  CentOs and RHEL/RedHat  distributions
/etc/init.d/ntpd start
or
service ntpd start

For Debian and Ubuntu  distributions (notice there’s a d missing)
/etc/init.d/ntp start
or
service ntp start

For Fedora and CentOS/Redhat/RHEL 7 distributions
 systemctl start ntpd.service

The system will start synchronizing.

Verifying the NTP operation

Enter the command:
# ntpq -p

And you’ll see an output similar as the follow:

ntpq

Values will be moving through time. The entry marked with the * is the server currently in use. If you see errors or no server association in a few minutes, probably the NTP service has not started. Review the log file to obtain more information.

Sync the local clock with the external NTP server for the first time

Issue the following command:
ntpdate –u 18.26.4.105                        -> or any server your NTP server is syncing to

Make the NTP service start when the computer boots

To add the ntp service to the list of daemons which start at startup:

For  CentOs and RHEL/RedHat  distributions
chkconfig ntpd on 

For Debian and Ubuntu  distributions (notice there’s a d missing)
systemctl enable ntp.service
o for Debian Jessie (Debian 8)
systemctl enable ntp

For Fedora and CentOS/Redhat/RHEL 7 distributions
systemctl enable ntpd


Configuring Linux NTP client in different distributions

To configure a Linux computer as a basic NTP client, we need to go through the following steps:

Installing the NTP package

For CentOs, RedHat and Fedora distributions
yum install ntp

For Ubuntu and Debian distributions
apt-get install ntp
or
sudo apt-get install ntp

Configuring the NTP service

With your favorite text editor, make sure these lines are present in the file /etc/ntp.conf

server 0.centos.pool.ntp.org iburst
server 1.centos.pool.ntp.org iburst
server 2.centos.pool.ntp.org iburst
server 3.centos.pool.ntp.org iburst

It is also wise to make sure the log file is established:

logfile /var/log/ntp.log

Server addresses vary according to the Linux distribution. You can use the default ones or specify your own time server or a public NTP server of your preference.  You can find a list of public ntp servers in this link: http://support.ntp.org/bin/view/Servers/NTPPoolServers.

It is recommended than more than one ntp server is present for redundancy in case one of the servers fail.

You might have noticed the word iburst in every line. The iburst option reduces the time in the initial synchronization and it is the default option.

The specified servers are used in a round-robin fashion. If you wish you to use one server above others, add the options prefer at the end of the server line like this:

server 0.centos.pool.ntp.org prefer

Starting the NTP Service

For  CentOs and RHEL/RedHat  distributions
/etc/init.d/ntpd start
or
service ntpd start

For Debian and Ubuntu  distributions (notice there’s a d missing)
/etc/init.d/ntp start
or
service ntp start

For Fedora and CentOS/Redhat/RHEL 7 distributions
 systemctl start ntpd.service

The system will start synchronizing.

Verifying the NTP operation

Enter the command:
# ntpq -p

And you’ll see an output similar as the follow:

ntpq

Values will be moving through time. The entry marked with the * is the server currently in use. If you see errors or no server association in a few minutes, probably the NTP service has not started. Review the log file to obtain more information.

Sync the local clock with the NTP server for the first time

Issue the following command:
ntpdate –u 18.26.4.105                        -> or any server your computer is syncing to

Make the NTP service start when the computer boots

To add the ntp service to the list of daemons which start at startup:

For  CentOs and RHEL/RedHat  distributions
chkconfig ntpd on 

For Debian and Ubuntu  distributions (notice there’s a d missing)
systemctl enable ntp.service
o for Debian Jessie (Debian 8)
systemctl enable ntp

For Fedora and CentOS/Redhat/RHEL 7 distributions
systemctl enable ntpd

I know, I know, I wish everybody could standardize. Feel free to comment with any possible correction or suggestions to this post.